How to recognize bad tie rod ends and axial joints?
Read more
The installation or replacement of a track control arm can be quite the pickle. Tips and tricks are thus more than welcome. That’s why we’ve created this article, in which we take you through the process step by step. Not much of a reader? Then you can watch the video by scrolling down.

For the best access to the front suspension, we recommend lifting the car with a two-post car lift.
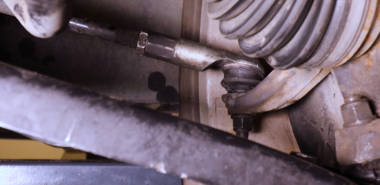
After removing the left front wheel, you turn the steering knuckle until the tie rod end is visible. Remove the nut of the tie rod end and disconnect it from the steering knuckle with the correct tools.
TIP: do not use a hammer! This way you prevent damage to the dust cover or the pin.
Next, the nut of the bolt that clamps the steering knuckle on the pin must be removed. Release the tension on the pin of the track control arm by gently tapping a chisel in between.
Use a punch to remove the clamping bolt. Then untighten the front bolt that attaches the track control arm to the frame. Pull the track control arm downwards out of the steering knuckle. Now, fully loosen the bolt at the back of the track control arm. Remove the front bolt and pull out the track control arm.

When you have removed the track control arm that needs to be replaced, you’ll have to prepare the new part for installation.
A first step in this process is cleaning the opening in the steering knuckle. Then, you prepare the new track control arm by lubricating the pin and the top of the dust cover with a small quantity of oil. Subsequently, press the dust cover until it moves up and down smoothly.

And then, it’s time! Install the new track control arm in the frame. You insert the front and back bolt and tighten them halfway.
TIP: do not use a hammer to insert the pin! This would damage the back of the ball joint and jeopardize the sealing for the interior mechanism. Also, when tapping the pin too far into the steering knuckle, the top of the dust cover would get stuck in the neck of the pin and never return to its ideal working position, leading to a big risk for water and dust to infiltrate.
In a second phase, you will manually insert the ball joint with care until the clamping bolt fits in the ball pin’s notch. Then, place a new locking nut and tighten accordingly to the prescribed tightening torques. Continue tightening the front bolt without tension. This will prevent the silent block from being tightened in the wrong position, causing early wear.
Now mount the wheel and slightly tighten the bolts. Lower the car and fixate the wheels according to the prescribed tightening torques. Move the car to the four-post car lift and make sure that the car’s suspension system is at rest. Now, tighten the bolts of the track control arm completely according to the prescribed tightening torques.
When all of this is done, you should not forget to align the wheels! And then, the car is ready and set to go!

